A beginner's guide to setup Mosh roaming terminal on Mac to access Google Cloud Compute Engine instance
Being new to training ML models using Google Cloud VM instances, I faced issues where my ssh connection to the cloud instance (using either the clound web-based ssh client or using cloud shell) would disconnect from time to time (for example when I power off my laptop or the network gets disconnected) which would terminate the model training process. Therefore I searched for a ssh client that can handle disconnection and can resume connection without disrupting the process running on the server and came across with Mosh mobile shell, a remote terminal app that supports roaming.
It took me a while to figure out how to set up a third party ssh terminal using the google cloud OAuth. Here's a step-by-step guide:
Since this writing, another Mosh user kindly advised me that using terminal multiplexer could achive my use case mentioned above but with much less effort, I tried and it works like a charm, thanks Jan! Here's how:
"For the use case you mentioned, it's probably more convenient to use tmux. It's a terminal multiplexer, so you can disconnect from the machine but keep your terminals open. To start it, run 'tmux'. You know you’re in tmux if you see a green status bar at the bottom. Start your ML training program like you normally would, then press ctrl+b, then d. You should see something like [detached (from session 0)]. Now you can disconnect from the machine, and your program will keep running. If you want to check back on its progress, log back in and type 'tmux attach'. Now you can detach again, close the terminal or run another command. It's very convenient."
You should have created a Google Cloud VM instance (Compute Engine) and be able to ssh into the instance using the cloud, using cloud console.
I'm using MacOS Hign Sierra, but OS version shouldn't matter much.
This step allows compute GCP to generate SSH keys automatically based on Google OAuth, so we don't need to generate ssh keys manually. Alternatively we could manually setup public and private ssh keys to manage the connection (see doc), but it might break the web-based ssh connection or cloud shell access.
Follow these instructions to enable OS login on your project / instance
In my case, I've granted access for my user account [email protected], which is part of the organization.
Install gcloud SDK and ssh into remote instance using gcloud command to generate public and private ssh keys
Download and install cloud SDK for mac
Then run the following command from mac terminal to access to cloud instance
$ gcloud compute --project "[your project]" ssh --zone "[zone]" "[instance name]"When you connect for the first time, there will be a browser popup that asks which google account to use for authentication. Make sure to choose the same user account that was granted access in the previous OS login step. This allows the gcloud command line to generate public and private ssh keys that will be used to access the remote server.
Once connected, type exit to logoff the ssh session. You can now find the public and private ssh keys stored under ${HOME}/.ssh/
$ ls ~/.ssh/google_compute_engine*
  /Users/jjwang/.ssh/google_compute_engine  // this is the private key
  /Users/jjwang/.ssh/google_compute_engine.pub // public ssh key
To test that the ssh keys are properly setup, run the following command from the mac terminal. Make sure to use your user account and cloud instance external IP address, in the format of youremail_gmail_com@external_ip
$ ssh -i ~/.ssh/google_compute_engine [email protected]Download the mac package and install. After installation, test by running mosh-client in mac terminal.
Remote access to server using gcloud command line
$ gcloud compute --project "[your project]" ssh --zone "[zone]" "[instance name]"And install depending on your VM instance OS following the instructions, for Debian, run
$ sudo apt-get install moshOnce installed, run mosh-server to test server installation.
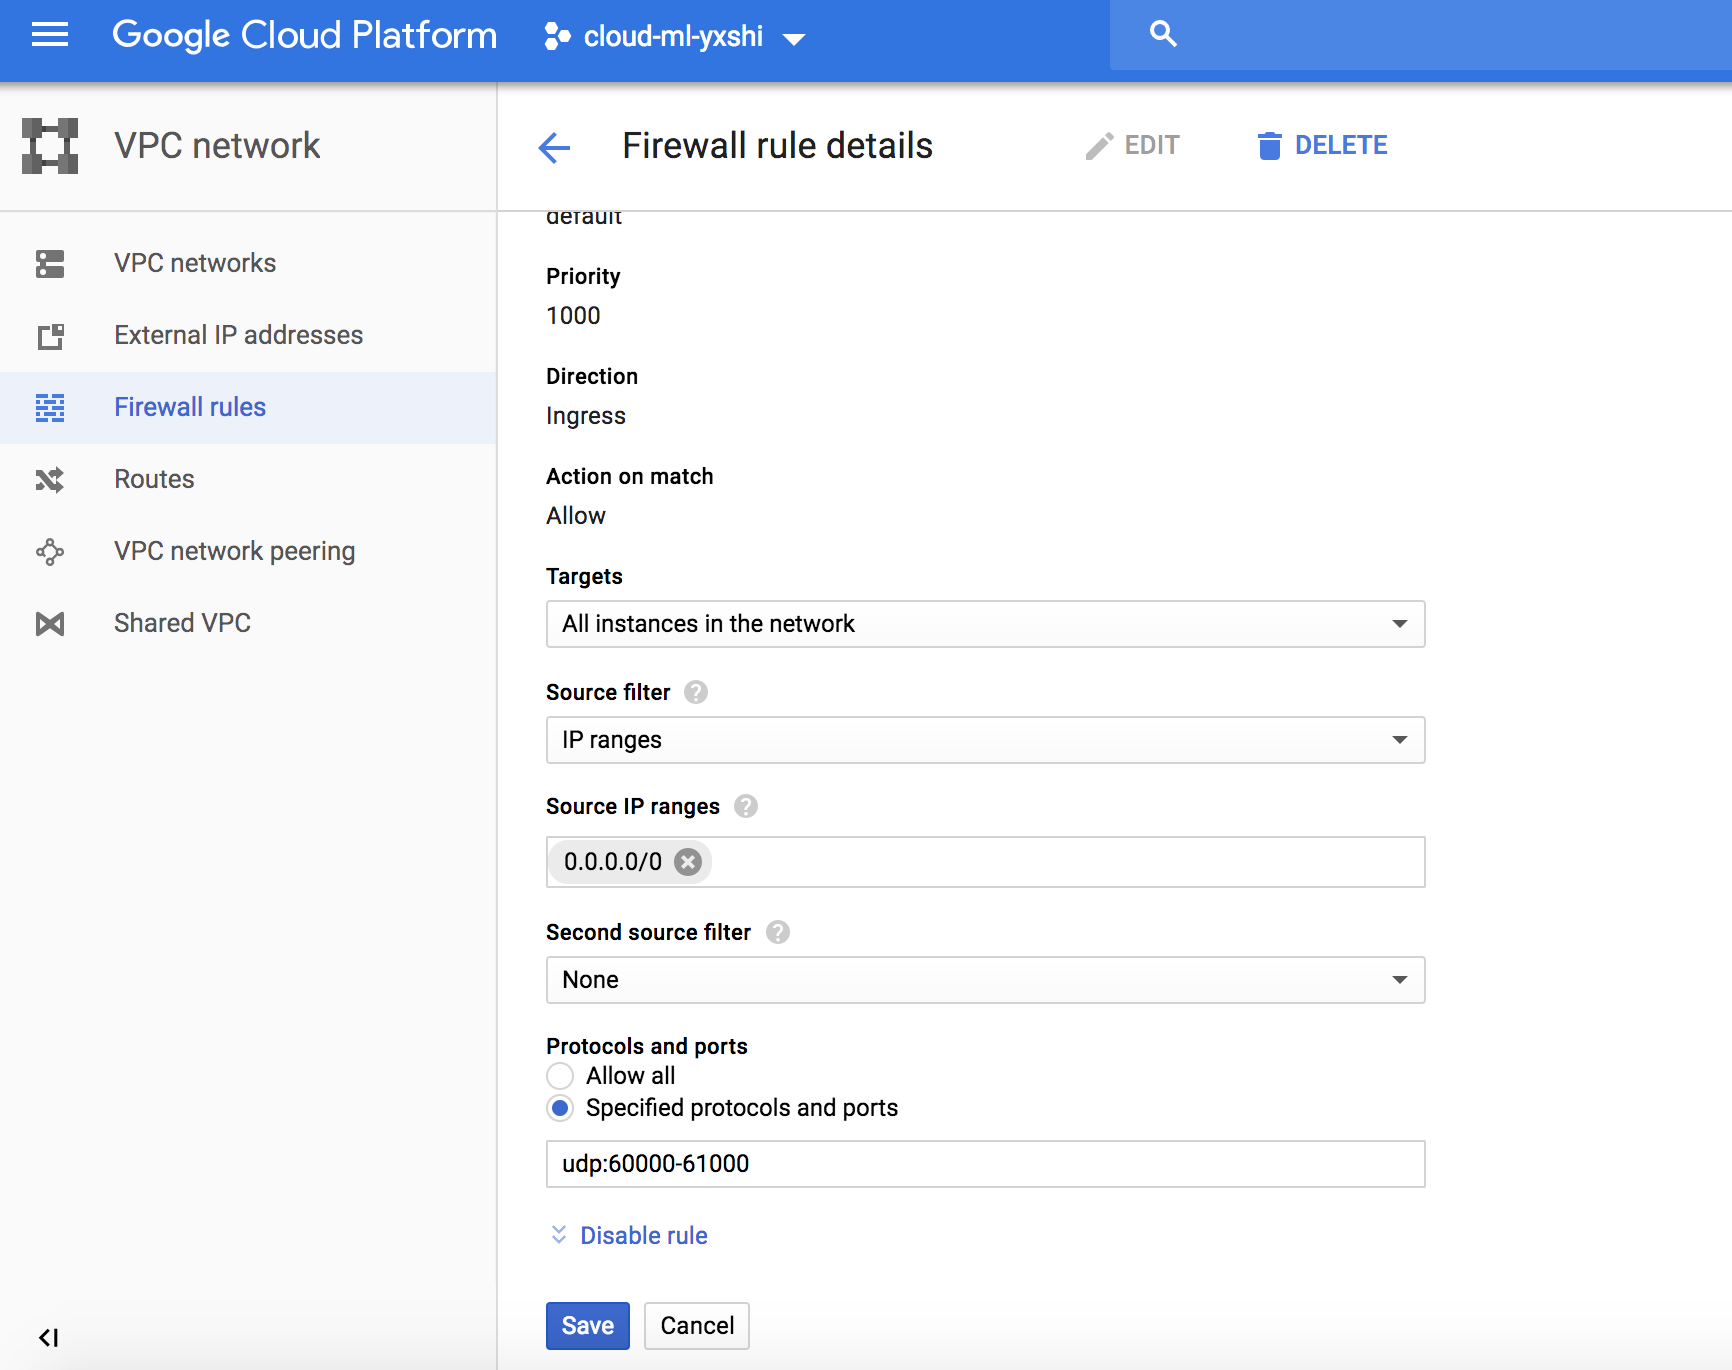
Mosh server-client will establish UDP connections using ports 60000 - 61000, so we need to allow these connections by configuring the firewall rules on cloud.
- In the google cloud web console, go to VPC network -> Firewall rules settings page
- Create a rule named
allow-mosh-udpwith the following settings
Finally, you should be able to connect to cloud server using Mosh roaming connections from your mac terminal, using a command such as the following:
$ mosh --ssh="ssh -i ~/.ssh/google_compute_engine" [email protected]Voila, now you can run your model trainings for hours on your cloud instances without worrying about any ssh disconnections, and when it's reconnected, you can get back to previous state before the disconnection, as if you are working in front of the remote server.
I hope this guide is useful for other people like me who are new to google cloud / ssh. If you have any questions or have a better way of making cloud ssh access robust and roamable, leave a comment here or shoot me an email at [email protected].
Happy machine learning and Moshing!:smile::heart:

This was extremely helpful!!